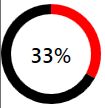
こういった円弧状のプログレスバーって見た目がかっこいいですよね。
今回はこれを作っていきます。簡単にできそうに思いますが、ちょっと手間がかかります。

Xaml
Shapeオブジェクト
まず最初に図形を描くところから始めます。
基本的に図形はCanvasパネル内に設置します。
xaml
<Canvas>
    <Ellipse
        Width="300"
        Height="300"
        Fill="Transparent"
        Stroke="Blue"
        StrokeThickness="5"
        Canvas.Left="0"
        Canvas.Top="0"/>
</Canvas>
Shapeオブジェクトには以下のような種類があります。
- Ellipse(楕円)
- Rectangle(四角)
- Polygon(多角形)
- Line(直線)
- Polyline(連続した線)
- Path (複雑な図形)
これらのShapeオブジェクトに設定できるプロパティとして重要なものは以下です。
- Stroke ・・・ アウトラインの色
- StrokeThickness ・・・ アウトラインの太さ
- Fill ・・・ 内部の色
Pathクラス
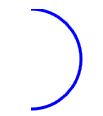
Pathクラスを利用すると複雑な図形を描くことができます。
複雑なので実例を見た方が早いと思います。
<Canvas>
    <Path Stroke="Blue" StrokeThickness="3">
        <Path.Data>
            <PathGeometry>
                <PathGeometry.Figures>
                    <PathFigure StartPoint="50,0" IsClosed="False">
                        <ArcSegment Point="50,100" Size="50,50" SweepDirection="Clockwise" IsLargeArc="False"/>
                    </PathFigure>
                </PathGeometry.Figures>
            </PathGeometry>
        </Path.Data>
    </Path>
</Canvas>
最初のPath Stroke=”Blue” StrokeThickness=”3″で、線の色と太さを決めています。
続いてPathFigure StartPoint=”50,0″ の部分で開始地点を定めています。
50,0 とは x=50, y=0の地点なので円の真上ですね。
IsClosed=”False”は線を閉じるかどうかの判定で、Trueにすると開始点と終了点が直線で結ばれます。
お次の<ArcSegment />ですが、これが円弧を表します。
円の大きさは Size=”50,50″で指定しています。 この場合は正円です。
そしてPoint=”50,100″はStartPointと対になる要素で、終点を表します。
x = 50, y = 100ですから円の真下です。
SweepDirection=”Clockwise” これは線の引き方で、時計回りか反時計回り(CounterClockwise)を選択します。
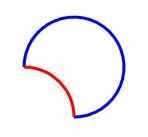
IsLargeArc=”False” というのは円弧の角度が180度を超えていますか?という意味です。これまでの部分で始点と終点、そして半径、向きを設定しているわけですが、角度によって2通り解釈できるためきちんと設定する必要があります。
これも画像を見た方が早いです。
赤と青の円弧はどちらも始点と終点が同じですが、赤の角度は90度、青の角度は270度です。
これを区別するためにIsLargeArcがあります。(青がTrueです)

ちなみに始点と終点を設定していますが、実際に描画されるものは線の厚みの分だけはみ出しますので、ぴったりサイズに収めたい場合には注意が必要です。
C#
さてここからが少し面倒なところです。
先ほど見たように、始点と終点さえ分かれば円弧は書けそうですね。
通常、始点は定点ですから難しくはありません。
問題は終点の方です。

こういう円グラフを書きたい時に、普通は終点の座標は意識しません。
多くの場合、%もしくは角度を意識します。
なので終点を指定する以外に角度を指定できるはずだと思って必死に検索をしたのですが、ニーズがないのか座標でしか指定できませんでした。
ということで、%の値から自分で座標を割り出す必要があります。
サインコサインなんて高校生以来じゃなかろうか。
これは再利用する価値がありそうなのでClassを自作した方が楽だと判断しました。
完成形がこちら。
public class CircleProgressBar
{
    private double progress { get; set; }
    private int width { get; set; }
    private int height { get; set; }
    private double radius { get; set; }

    private double endPointX { get; set; }
    private double endPointY { get; set; }

    public int StrokeThickness { get; set; }
    public Brush ForegroundStroke { get; } = new SolidColorBrush(Colors.Red);
    public Brush BackgroundStroke { get; } = new SolidColorBrush(Colors.Black);

    public ReactiveProperty<string> StartPoint { get; } = new ReactiveProperty<string>();
    public ReactiveProperty<string> EndPoint { get; private set; } = new ReactiveProperty<string>();
    public string ForegroundSweepDirection { get; } = "ClockWise";
    public string BackgroundSweepDirection { get; } = "CounterClockWise";
    public ReactiveProperty<bool> ForegroundIsLargeArc { get; private set; } = new ReactiveProperty<bool>();
    public ReactiveProperty<bool> BackgroundIsLargeArc { get; private set; } = new ReactiveProperty<bool>();
    public bool IsClosed { get; } = false;
    public string Size { get; }

    public CircleProgressBar(int width, int strokeThickness, double progress)
    {
        this.width = width;
        this.height = width;
        this.StrokeThickness = strokeThickness;
        this.radius = (this.width-StrokeThickness)/2.0;
        this.StartPoint.Value = (this.width / 2)+","+(strokeThickness / 2.0);
        this.Size = this.radius + "," + this.radius;
        SetProgress(progress);
    }

    public void SetProgress(double progress)
    {
        this.progress = progress;
        if (this.progress >= 1)
        {
            this.progress = 0.999;
            ForegroundIsLargeArc.Value = true;
        }
        else if (this.progress > 0.5)
        {
            ForegroundIsLargeArc.Value = true;
        }
        else if (this.progress > 0)
        {
            ForegroundIsLargeArc.Value = false;
        }
        else
        {
            this.progress = 0.001;
            ForegroundIsLargeArc.Value = false;
        }
        this.BackgroundIsLargeArc.Value = !ForegroundIsLargeArc.Value;

        this.endPointX = (double)this.width / 2 + this.radius * Math.Cos((90 - 360 * this.progress) * Math.PI / 180);
        this.endPointY = (double)this.height / 2 - this.radius * Math.Sin((90 - 360 * this.progress) * Math.PI / 180);
        this.EndPoint.Value = this.endPointX + "," + this.endPointY;
    }
}
ReactivePropertyを使っているので注意です。
無くても困らない項目もいくつかありますが、改修しやすいようにプロパティを残しています。
IsClosedなんて常にFalseでしょうからxamlにべた書きでもいい気もします。
Binding上の注意点が1つ。
Strokeにバインドする場合、型はBrush型の必要があります。
コンストラクタには引数として、幅と線の厚み、%を指定するようにしています。
指定された幅の円弧 (線の厚みを含んだサイズ )を返すように作っています。
Progressを変化させる場合にはSetProgress()を使ってください。
ViewModel
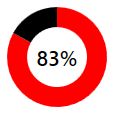
this.CircleProgressBar = new CircleProgressBar(100, 20, 0.83);
これをViewModelでCircleProgressBar というプロパティ名で実装してあげると、以下のxamlがそのまま使えます。
xaml
<Canvas>
    <Path Stroke="{Binding CircleProgressBar.ForegroundStroke}" StrokeThickness="{Binding CircleProgressBar.StrokeThickness}"  >
        <Path.Data>
            <PathGeometry>
                <PathGeometry.Figures>
                    <PathFigure StartPoint="{Binding CircleProgressBar.StartPoint.Value}" IsClosed="{Binding CircleProgressBar.IsClosed}">
                        <ArcSegment Point="{Binding CircleProgressBar.EndPoint.Value}" Size="{Binding CircleProgressBar.Size}" SweepDirection="{Binding CircleProgressBar.ForegroundSweepDirection}" IsLargeArc="{Binding CircleProgressBar.ForegroundIsLargeArc.Value}"/>
                    </PathFigure>
                </PathGeometry.Figures>
            </PathGeometry>
        </Path.Data>
    </Path>
    <Path Stroke="{Binding CircleProgressBar.BackgroundStroke}" StrokeThickness="{Binding CircleProgressBar.StrokeThickness}">
        <Path.Data>
            <PathGeometry>
                <PathGeometry.Figures>
                    <PathFigure StartPoint="{Binding CircleProgressBar.StartPoint.Value}" IsClosed="{Binding CircleProgressBar.IsClosed}">
                        <ArcSegment Point="{Binding CircleProgressBar.EndPoint.Value}" Size="{Binding CircleProgressBar.Size}" SweepDirection="{Binding CircleProgressBar.BackgroundSweepDirection}" IsLargeArc="{Binding CircleProgressBar.BackgroundIsLargeArc.Value}"/>
                    </PathFigure>
                </PathGeometry.Figures>
            </PathGeometry>
        </Path.Data>
    </Path>
</Canvas>
まさか単純な円弧のグラフを書きたいだけでも座標を自分で計算しないといけないとは思わなかった。標準クラスで半円とかは角度指定できるように実装してくれてもいいのになぁ。


コメント